Saturday, March 19, 2011
Monday, March 14, 2011
Harvesting Electricity from the Sun Puts Money Back in your Pocket
Harvesting electricity is easier than harvesting vegetables in a garden. There’s no weeding, no tilling, no fertilizing, no pesticides, and no watering. All the labor is in the system design and installation. The best thing about sunshine is that it is absolutely free and we can count on the sun rising every day to provide solar energy. That’s why plants rely on photosynthesis for survival. Conversion of solar energy to electricity is economical and a properly designed solar electric system is very reliable. Once a system is installed, the only thing you need to do is figure out how to spend the money that you are no longer paying to Long Island Power Authority.

Powerful energy is produced by the sun from nuclear fusion of hydrogen. Solar energy travels through space, penetrates the Earth’s atmosphere and supports life as we know it. Solar cells are silicon semiconductors that absorb sunlight and cause electrons to flow. This is the photovoltaic effect, or using English, this is the light electric effect.
The electrons are gathered using a grid of metal strips. This flow of electrons is direct current electricity. The amount of electricity is increased to a useful amount by connecting many solar cells together to create a solar module. A solar electric system includes solar modules assembled to make up a photovoltaic array, brackets to hold it in place, wires to connect it, and an inverter to make the electricity useful in your house.
There are a variety of semiconductor materials available and many different manufacturers of solar cells and modules. Several rail or bracket systems also exist. In addition, there is a range of technologies for inverters; you can use a large inverter for the entire array or microinverters, which accompany each module. These are the details that determine how much electricity will be produced and how long a solar electric system will last. Quality counts.
Here’s how we got to where we are now: The large rectangular modules are most common for rooftop and ground mounted systems due their durability and reliability. Their life will far exceed that of a thin film or laminate photovoltaic material. Wear from weather is limited since the photovoltaic cells are encased in sealed glass with rugged metal frames around the edges. Metal frames enable strong attachment to the rails. The size is convenient and allows for portrait or landscape orientation. This allows flexibility for a layout that is helpful with the variety of roof sizes and shapes. When solar modules are installed using a modern rail system, the result is a continuous photovoltaic array with no gaps between the modules. Eliminating gaps ensures that the shingles on the roof beneath the array are preserved from wearing due to weather and sun.
A quality system will produce electricity for more than 30 years and a system can be installed for less than $10,000, which will produce more than 2,000 kilowatt-hours per year of electricity. More than half of that money comes back to you in your 2011 tax return, if you pay income tax. With a final price of less than $5,000, you can see why these things are popping up on rooftops all over the place. Many roofs can fit more, and it’s a more a matter of what your checkbook can handle. Prepaid electricity is an investment that continues to pay back year after year. Producing electricity using free solar energy is a winning Sustainability Solution.
Reference : hamptonbays.patch.com
Saturday, March 12, 2011
Monday, March 7, 2011
Solar Air Heater
Introduction
Air collectors can be installed on a roof or an exterior (south facing) wall for heating one or more rooms. Although factory-built collectors for on-site installation are available, do-it-yourselfers is better way to go if you have time.
The collector has an airtight and insulated wood frame and a black painted aluminum sheet for absorbing heat with black soda or beer cans and glass in front of it. Solar radiation heats the aluminum which, in turn, heats the air in the cans. An electrically powered fan or blower pulls air from the room through the collector, and blows it back into the room.
Roof-mounted collectors require ducts to carry air between the room and the collector. Wall-mounted collectors are placed directly on a south-facing wall, and holes are cut through the wall for the collector air inlet and outlets.
Simple “window box collectors” fit in an existing window opening. They can be active using a fan, or passive. In passive types, air enters the bottom of the collector, rises as it is heated, and enters the room.

Before Building the Solar Air Heater
First you will need 72 large soda or beer cans (“tall boy”), the cans will be laid down in 8 x 9 grid. The moment you acquire the cans we suggest you stack on top of one another 8 cans. After you are done stacking, measure the height of the 8 cans, than measure the width of a single can. The reason for this is since all cans differ by few mm, we cannot present you with exact dimension for the casing, and therefore you will need this measurement for the fabrication of the case for the cans.
You will need enough plywood to construct a frame for the tin cans. The measurements of the inside of the case will be: the height of the 8 tin cans stacked on top of one another + 1”, and the width of a single can x 9. With these measurements you can fabricate tight enough casing which should just fit the tin cans. Just to get an idea how the casing should look when it’s done take a look at the first image in the next chapter.
You will also need an aluminum sheet that will lie inside the casing which the soda cans will be attached to, and a glass or Plexiglas to cover the casing once the cans are inside it.
And finally you will need matt black paint to paint the tin cans and the aluminum sheet, and silicone to attach the cans to the aluminum sheet and the Plexiglas or glass to the casing.
Building a Solar Air Heater
 Step 1: Building the Case
First of all make a box out of plywood. Set the dimensions of the width of the interior of the box exactly the same as the width of 9 tin cans next to each other, and the height as 8 cans on top of each other plus one inch.
For increased efficiency, you should insulate the box to prevent heat escaping through the plywood. If so, size your box so that the cans and insulation will fit snuggly.
 Step 2: Drilling the Cans
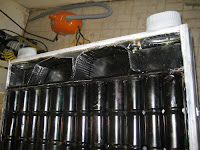
For the air to pass through a column of cans, holes must be drilled into them. Since there is already a hole at the top of each can for drinking, you will only need to drill a hole through the bottom of the cans.
The bottom and top can of each column a 1/2 to 1 inch hole is drilled in the side. This is done so the air can flow from column to column. Take a look at the images below so you can see the arrangement of the cans and the size of the holes.
 Step 3: Building the Can Columns and Painting
The cans of each column are glued together using silicon adhesive and painted using black paint to help them absorb the sun’s energy.
The inside of the box must also be painted with the same paint before the columns of cans are glued into position using silicon adhesive. The outside of the box should be treated with preservative, varnish, or paint to help it survive the elements for many years.
 Step 4: Sealing the Solar Heating Box
Ideally the whole unit will be sealed with a sheet of tempered glass. This glass is very strong and resilient to heat. However, tempered glass is also very expensive. Therefore Plexiglas can be used, but it will degrade far more quickly.
A hole at the top of the box is drilled so it acts as the hot air outlet and can be connected to the building/room to be heated using an insulated pipe.
 Step 5: Mounting a Fan (Not mandatory)
A PV Electric Solar Panel could be used to power a small fan to drive air through the snake. The final temperature achieved would be lower, but having a large quantity of 30 degree Celsius air entering a room is much better than a much smaller quantity of 50 degree Celsius air.
Step 6: Mounting
You will mount the Solar Air Heater on a south wall or the roof facing the south. On the top of the solar air heater you should drill a hole from which an insulated pipe will come out and will go in the room through a wall. This pipe will bring the hot air inside the room. The same thing should be done with the bottom of the solar collector. The difference between the top and bottom pipe is that the top pipe is used to bring hot air inside the room while the bottom pipe is used to bring cold air inside the collector. If you decide to mount a fan on the collector it should be mounted only at the top pipe.

Air collectors can be installed on a roof or an exterior (south facing) wall for heating one or more rooms. Although factory-built collectors for on-site installation are available, do-it-yourselfers is better way to go if you have time.
The collector has an airtight and insulated wood frame and a black painted aluminum sheet for absorbing heat with black soda or beer cans and glass in front of it. Solar radiation heats the aluminum which, in turn, heats the air in the cans. An electrically powered fan or blower pulls air from the room through the collector, and blows it back into the room.
Roof-mounted collectors require ducts to carry air between the room and the collector. Wall-mounted collectors are placed directly on a south-facing wall, and holes are cut through the wall for the collector air inlet and outlets.
Simple “window box collectors” fit in an existing window opening. They can be active using a fan, or passive. In passive types, air enters the bottom of the collector, rises as it is heated, and enters the room.
Before Building the Solar Air Heater
First you will need 72 large soda or beer cans (“tall boy”), the cans will be laid down in 8 x 9 grid. The moment you acquire the cans we suggest you stack on top of one another 8 cans. After you are done stacking, measure the height of the 8 cans, than measure the width of a single can. The reason for this is since all cans differ by few mm, we cannot present you with exact dimension for the casing, and therefore you will need this measurement for the fabrication of the case for the cans.
You will need enough plywood to construct a frame for the tin cans. The measurements of the inside of the case will be: the height of the 8 tin cans stacked on top of one another + 1”, and the width of a single can x 9. With these measurements you can fabricate tight enough casing which should just fit the tin cans. Just to get an idea how the casing should look when it’s done take a look at the first image in the next chapter.
You will also need an aluminum sheet that will lie inside the casing which the soda cans will be attached to, and a glass or Plexiglas to cover the casing once the cans are inside it.
And finally you will need matt black paint to paint the tin cans and the aluminum sheet, and silicone to attach the cans to the aluminum sheet and the Plexiglas or glass to the casing.
Building a Solar Air Heater

First of all make a box out of plywood. Set the dimensions of the width of the interior of the box exactly the same as the width of 9 tin cans next to each other, and the height as 8 cans on top of each other plus one inch.
For increased efficiency, you should insulate the box to prevent heat escaping through the plywood. If so, size your box so that the cans and insulation will fit snuggly.
For the air to pass through a column of cans, holes must be drilled into them. Since there is already a hole at the top of each can for drinking, you will only need to drill a hole through the bottom of the cans.
The bottom and top can of each column a 1/2 to 1 inch hole is drilled in the side. This is done so the air can flow from column to column. Take a look at the images below so you can see the arrangement of the cans and the size of the holes.
The cans of each column are glued together using silicon adhesive and painted using black paint to help them absorb the sun’s energy.
The inside of the box must also be painted with the same paint before the columns of cans are glued into position using silicon adhesive. The outside of the box should be treated with preservative, varnish, or paint to help it survive the elements for many years.

Ideally the whole unit will be sealed with a sheet of tempered glass. This glass is very strong and resilient to heat. However, tempered glass is also very expensive. Therefore Plexiglas can be used, but it will degrade far more quickly.
A hole at the top of the box is drilled so it acts as the hot air outlet and can be connected to the building/room to be heated using an insulated pipe.

A PV Electric Solar Panel could be used to power a small fan to drive air through the snake. The final temperature achieved would be lower, but having a large quantity of 30 degree Celsius air entering a room is much better than a much smaller quantity of 50 degree Celsius air.
Step 6: Mounting
You will mount the Solar Air Heater on a south wall or the roof facing the south. On the top of the solar air heater you should drill a hole from which an insulated pipe will come out and will go in the room through a wall. This pipe will bring the hot air inside the room. The same thing should be done with the bottom of the solar collector. The difference between the top and bottom pipe is that the top pipe is used to bring hot air inside the room while the bottom pipe is used to bring cold air inside the collector. If you decide to mount a fan on the collector it should be mounted only at the top pipe.

Subscribe to:
Comments (Atom)